|

|
|
|
 |
|
Before pasteurization, milk will sour and separate naturally if not refrigerated. Left alone on the counter,'friendly' bacteria begins digesting the naturally occurring milk proteins and sugars. When the 'friendly' bacteria have produced enough lactic acid to consume and inactivate the 'bad' bacteria, the milk is considered preserved for a few days, to a number of weeks. Interestingly enough, it's the breakdown of the proteins and sugars that may allow those with milk intolerances to consume fermented/cultured products. In a nutshell, this is the beginning of all cultured and fermented milk products. We are mostly familiar with yogurt. It's in almost every grocery store refrigerator, laden with flavors, sugars, additives and preservatives. Occasionally a manufacturer will toss in a mix of granola, chocolate chips or cereal *gasp* in an effort to make it more appealing. And while many consumers will purchase these sugar laden products, it is important to realize that the added sugars and preservatives is detrimental to the health benefits you are striving for when purchasing. Yogurt is NOT soured milk. Yogurt is produced by first heating milk, preferably raw, but pasteurized can be used. Ultra-pasturized isn't recommended by this writer, as it doesn't produce favorable results, wherein a 'live' culture is then introduced. This culture can be obtained via mail order or internet from companies that specially grow the culture desired, or you can use a bit of organic, plain yogurt or your own from a batch previously made. Different cultures produce different results and/or textures. Most often used here in yogurt is L-acidophilus. Others that may be included are S. thermophilus, L. bulgaricus, Bifidus, L. casei and possibly L. rhamnosus. It's also interesting to note that we are born with some of these friendly bacteria in our digestive tract. Many health advocates recommend taking probiotics on a daily basis for digestive and immune health, making your own yogurt is a simple way to control exactly what is in yours. There have been numerous reports and articles written on the benefits of yogurt and cultured dairy products to lower cholesterol that helps protect against bone loss. As mentioned above, by keeping the immune system up to snuff, you are doing your part to keep some pesky pathogens at bay, guarding against disease and helping to get the fullest nutritional value of all the food you eat. What follows are my recipes for making yogurt at home, both with raw and pasteurized milk. I have used both a yogurt machine (which is nice because it's pretty foolproof and provides multiple individual portions) and a quart mason jar left overnight in the oven with a pilot light. personally, I prefer the mason jar left overnight in my oven. I donated the yogurt maker.
INGREDIENTS - MAKES ONE QUART 1/2 cup ORGANIC plain yogurt, or 1/2 cup yogurt from a previous batch (this is what you'll use to introduce those favorable bacteria, l-acidophillis, bulgarcius to name a couple because they likely are not present in plain ole milk) 1 quart pasteurized whole milk, non-homogenized if you can find it. candy thermometer (I use an instant read…the important thing is to test the milk and NOT touch the bottom of your pan!) 1 quart clean glass jar or 8-4 oz glass jars as provided in your yogurt maker (like I said, I prefer using the quart jar in the oven. But really, feel free to try both!)
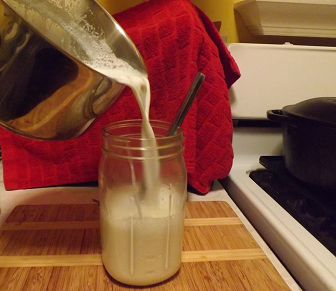
Slowly heat the milk to 180 degrees. Remove from heat and allow the milk to cool to 110 degrees. (This takes longer than you’d think. Stirring helps cool it down a little faster. ) Stir in the half cup of yogurt and pour all in a glass container. Stir, really stir so there are not lumps. (if using a yogurt maker, follow the manufacturers directions) this is an essential part because remember, plain old milk doesn't have active acidophilus or bacillus cultures, They are LIVE organisms (killed during the heat of pasteurization!) and will multiply in your cooled milk as it ferments. You can also purchase these cultures online OR just add in a half cup or so of organic, PLAIN yogurt to each batch to get the party started. :) . This method is what I have always used and it works very well for me. It's also what most DIY-er's use!
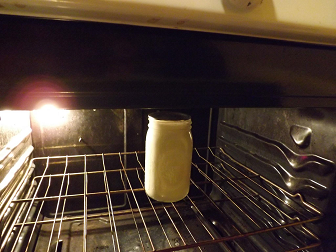
I prefer a glass quart mason jar, but a shallow dish will work too. I add a knife into the jar to help absorb the heat of the milk and prevent cracking the jar. Spilled milk is a mess to clean up. Trust me on this. Cover and place in a warmed oven overnight, or 8-12 hours. Make your own homemade yogurt without a yogurt maker. You can use either raw milk or pasteurized milk. I have a gas oven, and leaving the pilot and interior light works well by themselves. (I’ve also used an electric oven, preheated to 225 -250 degrees, TURN OFF, and keep the interior light on.) Transfer to the refrigerator in the morning. It will thicken as it cools.
This is my preferred method. I leave my milk to ferment in the oven for at least 8-12 hours. Your pilot light and insulated oven box keeps the milk at the 'perfect temperature' for fermentation, just as a yogurt maker would. I've even heard of folks using a heating pad to set their jars on to keep them warm. I've forgotten my yogurt and left it in the oven for a day with no issues, but I'm brave like that. I keep in mind that back in the day, when folks in India were carrying around goatsmilk in bladders to ferment that they didn't have the luxury of ovens, thermometers or clocks! They tasted it and when it tasted right/good, then it was ready! Just keep in mind that the longer your yogurt ferments, the 'tangy-ier" it will be.
****variation for RAW MILK Heat milk to 110 degrees. Remove a couple of tablespoons of warm mile and add this to one tablespoon of ORGANIC or yogurt from a prior batch. Stir and add to your quart of milk, stir well and pour into a quart mason jar. Add ANOTHER couple of teaspoons yogurt to the jar and stir well. Follow oven instructions above or manufacturers directions on yogurt maker. From here, the possibilities are endless. Add granola, or a couple of tablespoons of fruit preserves. Your yogurt should keep for a number of weeks ( I'm guessing that it will be eaten before 4 weeks though) covered and refrigerated. And always be prepared for a flop or a runny batch. It happens. But rest assured that you can still use it in smoothies, Middle Eastern Indian dishes, or freeze it for later. If it does get to the tangy side, add a drop of vanilla and a dash of maple syrup or stevia to sweeten it up. I'm going to bet that you'll never buy yogurt in quantity again. The guidelines for the above recipes are from my ‘go to’ book, “Nourishing Traditions” by Sally Fallon that I purchased many, many years ago. I was blessed to be able to hear her speak in Nashua, NH a number of years ago. The impression has lasted, and has allowed me and my family to lead a healthy lifestyle. It’s right there with my rice cooker, one of the best investments I’ve ever made.
I'm a farm girl foodie (currently working toward my ND certification) with food allergies. I am happy to share my tips and tricks to make your life healthier and happier. DISCLAIMER **This web site's goal is to provide you with information that may be useful in attaining optimal health. Nothing in it is meant as a prescription or as medical advice. You should check with your physician before implementing any changes in your exercise or lifestyle habits, especially if you have physical problems or are taking medications of any kind. |
| 314.420.5099 |
| Questions regarding this site: webmaster@drstandley.com |
| Copyright 1999-2026: Dr. Loretta J. Standley - All Rights Reserved. |


 MAKE YOUR OWN HOMEMADE YOGURT
 Fermented and cultured milk, aka yogurt, sour cream, creme fraishe, cheese, whey are an important part of so many cultural diets. It's really only in the West where milk is so greatly consumed in its natural or unfermented state.


